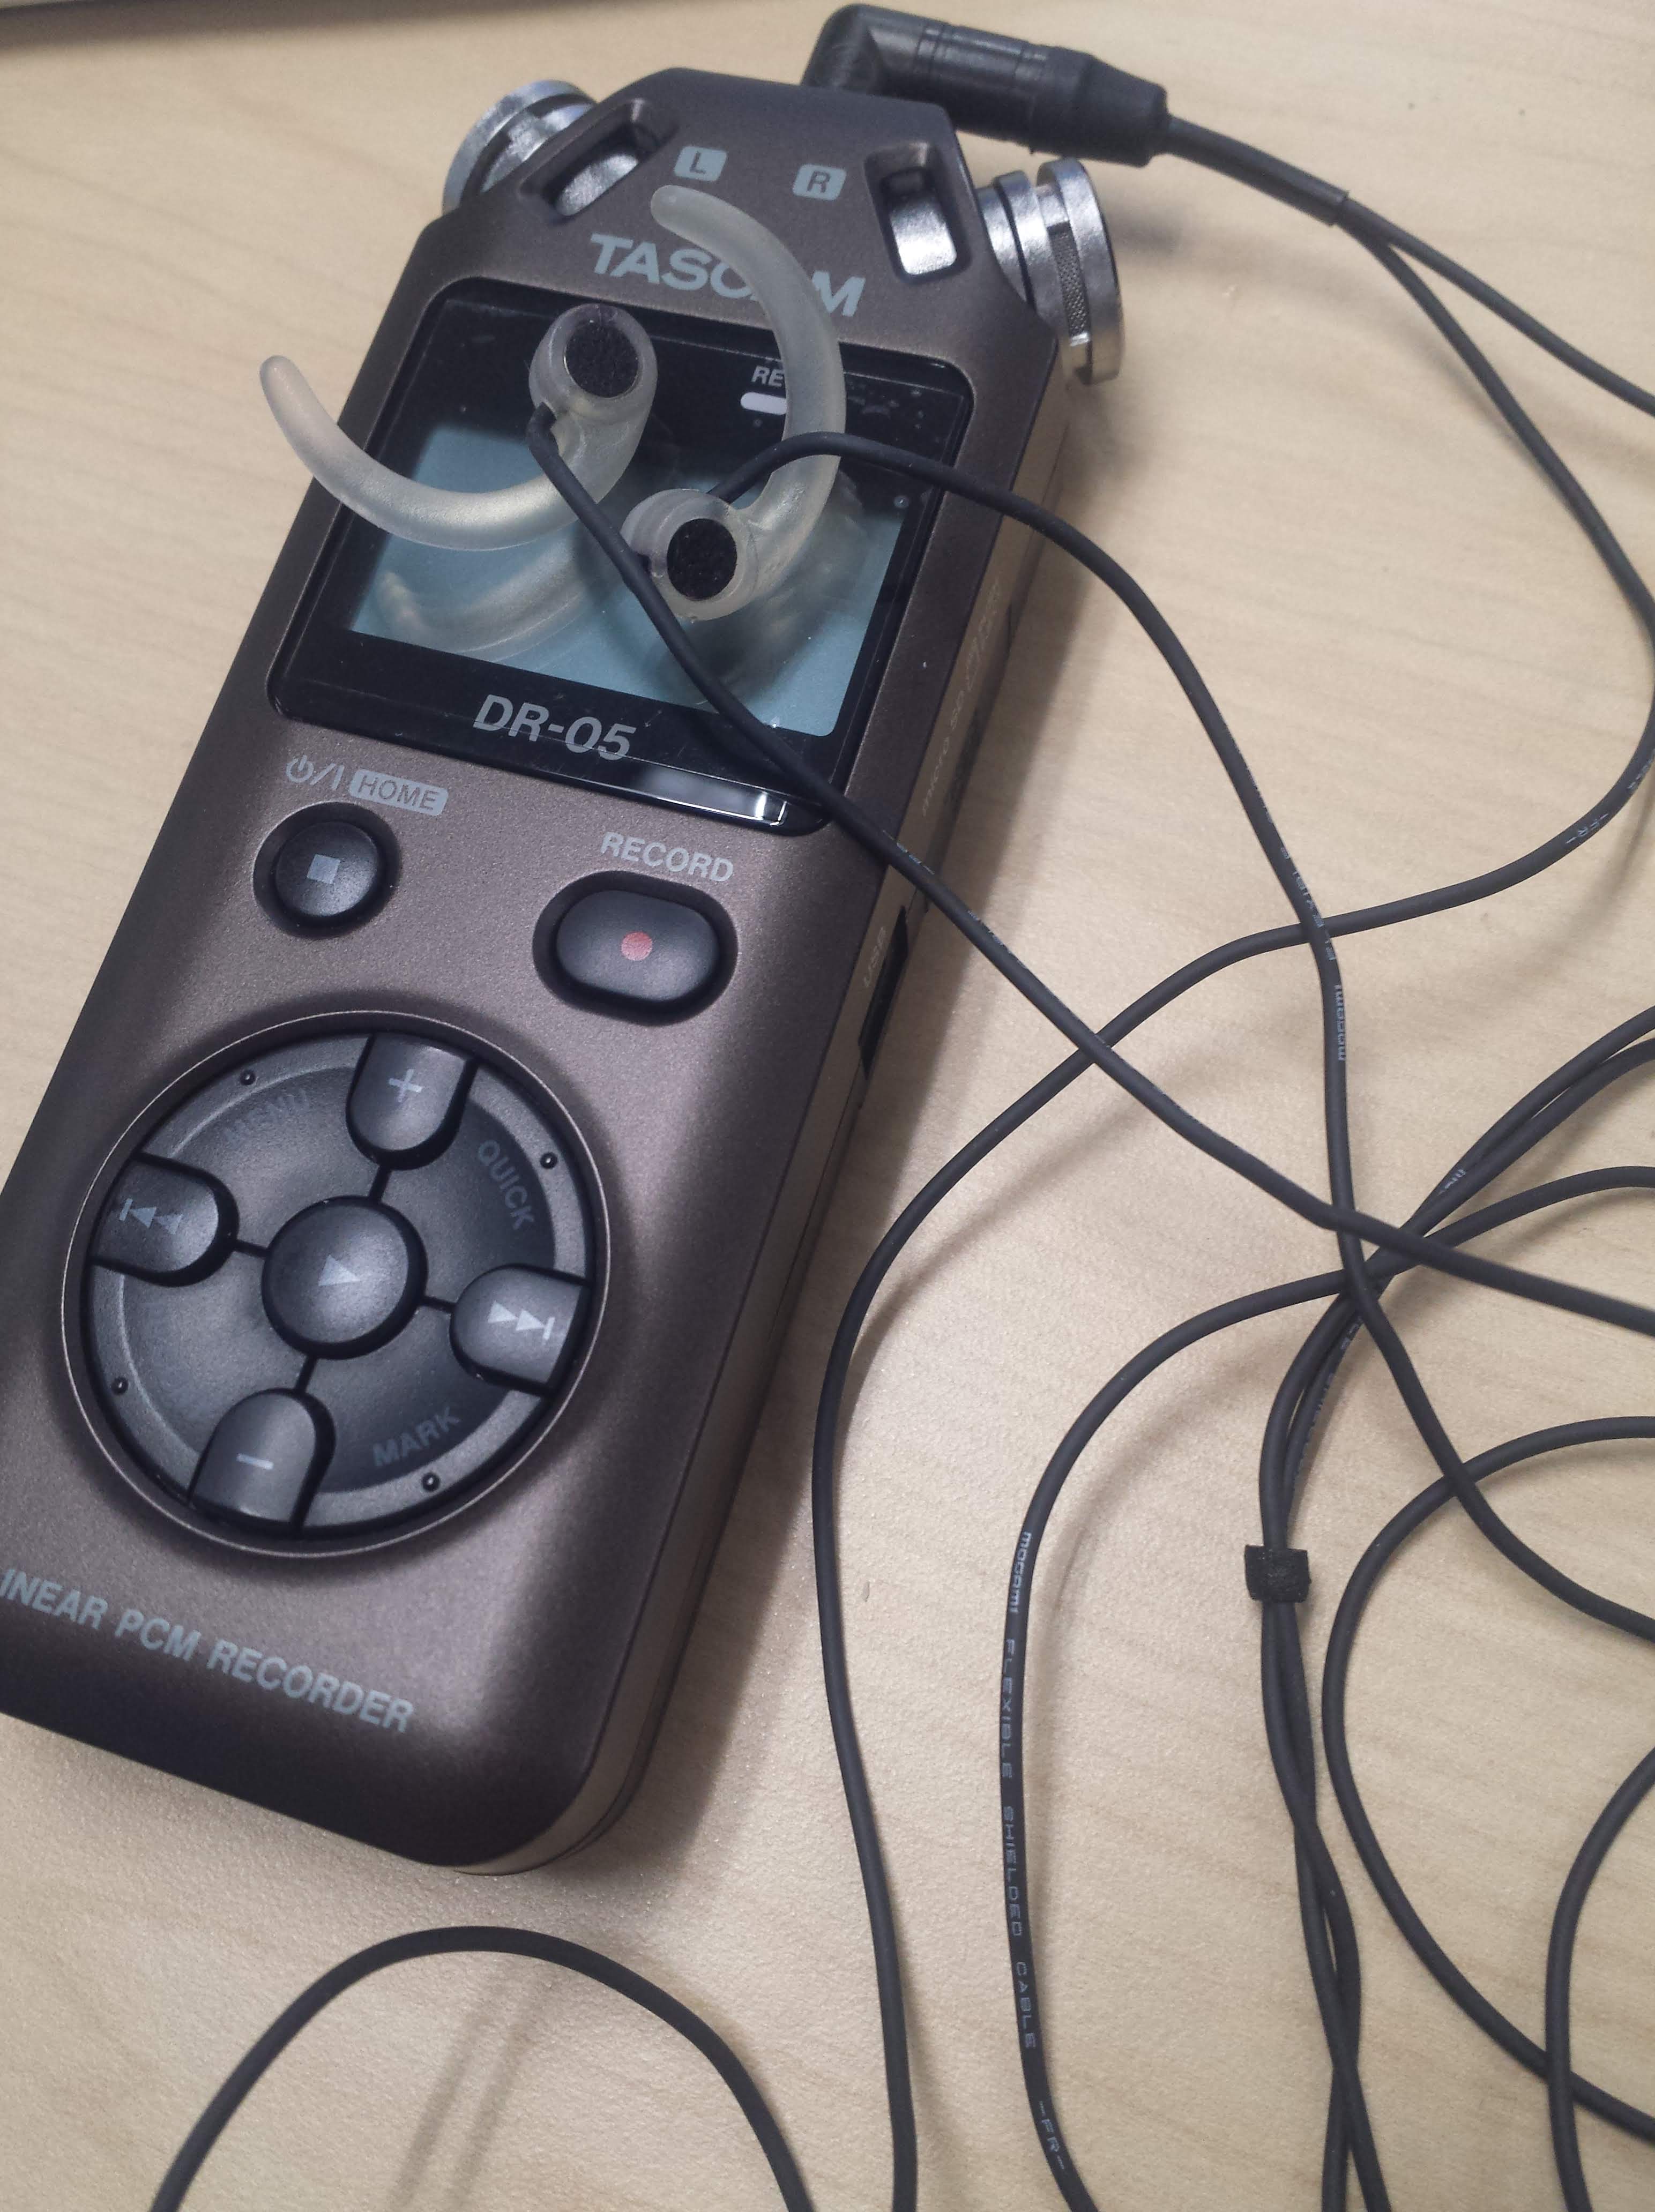
I like recording ambient sounds of nature, locations, equipment, and other assorted noises. When I play my recordings back, I want them to sound exactly like when I was there. Here is the technique, equipment, and settings I use.
Last updated: 27-September-2026


The Technique, Equipment, and Settings
Binaural Recording
The effect of “being there” is achieved through binaural recording. Binaural recording, simply and for my purposes, is recording sound with two microphones separated by a human head or reasonable facsimile. By doing this, when you play it back, you get an authentic reproduction of the sound as if your ears were hearing it in real-time.
Equipment – Microphones
To get high-quality sound, I use either
- a mini-ears (fake ears) binaural set-up as shown below or
- larger ears (fake ears), binaural set-up, or
- in-ear binaural microphones that I wear in my own ears (preferred – gets best binaural effect)
- or an A-B (stereo, not binaural) setup with two clip-on mics.
Scroll down a bit to see these.


The binaural “mini-ears” I use are from SoundProfessionals and are model number MS-MINI-BINAURAL-EARS – Ultra-low-noise binaural microphone with human-shaped ears. These are unfortunately discontinued by the manufacturer, but the alternative is a “head” with wider spacing and a lot better binaural separation.

They are realistic-looking (and internally accurate) ears that have microphones embedded inside them to simulate a head. They are more portable than a full head system and record great binaural sound. I like to use these when I can put them on a tripod and leave them outside in the environment. Indoors, they draw too much attention. I use these when I don’t have the ability to be still enough or don’t have the time to spend sitting and recording, or when the presence of a human would disturb the environment. They do not give as realistic a binaural response as the in-ear microphones that are worn. They have a mini plug for output so can only effectively be used on the DR-05 recorder.
The in-ear, worn microphones are also from SoundProfessionals. You wear these, and they are inconspicuous, as it looks like you are listening instead of recording. People don’t know you’re recording, so everyone acts naturally around you, and no questions are asked. These microphones are from SoundProfessionals.
I recommend the Master Series ultra-low noise, in-ear Binaural microphones (shown in the image below) because I can hear what I am recording with them. When I order these, I get the Mogami right-angle connector because it fits well with the top of my DR-05 and DR-05X recorders and is less likely, in my case, to stress or break. However, SoundProfessionals have XLR and premium cable options, so choose what works best for you.

With these, I can record the ambiance of an area without drawing attention to myself much at all. They give a much more realistic response in the recordings, and you get a true feeling of “being there” when playing back on headphones.

I usually put the recorder in my pocket while recording, and it looks like I’m listening to music on a phone or portable player. People hardly notice.
Or, I’ll have it in my coat pocket or lying on my coat next to me in a restaurant or wherever I am with the binaural microphones in my ears. Click the right arrow in the Instagram post below to see them in my ears.
Another in-ear model is available if you don’t mind not being able to hear what you are listening and recording. This is model number Ultra-low noise, in-ear Binaural/ASMR microphones and seem to be more durable than the other version, but have bigger in-ear portions so they block your hearing.

Lastly, I have used a set of Deluxe waterproof Binaural microphones with premium cables, windscreens and removable clips in an A-B (not binaural) microphone setup. These are good microphones but not as low in noise as others, although they are waterproof, which can be a serious advantage when recording outdoors in inclement weather.

Below you can see my A-B setup on the right (left, foreground tripod holds a camera) with my recorder in the middle and my microphones clipped to a mic stand spacer bar, so the separation is about a foot.

Power
Power (mic-power) is needed to activate and use these microphones. The mini binaural ears and in-ear microphones need power, so I turn on the power option within my recorder, and these high-sensitivity microphones really give a true binaural experience. This is called external power on the DR-05 series of recorders (quick menu option) and is called “phantom power” on the DR-40X (slide switch on the left side of the recorder). Make sure the power to run the microphones is turned on with whatever recorder you are using. It is good to turn off the recorder completely, connect the microphone, then turn on the recorder with mic-power on. This will prevent damaging the microphones or your recorder. Do not unplug or plug the microphones while mic-power is “hot” or on.
Wind
Wind protection is a real thing and must be considered. You will have lots of wind noise to edit if you do not cover the ears/microphones with a foam or furry cover during even the slightest windy weather. Yes, you give up some sensitivity to lower-level noises, but I find it is better to prevent the wind noise if possible instead of editing it out later.
The in-ear microphones have little foam pieces that go over the microphones and then into your ear. I am trying the SoundProfessionals WT-2200 windscreens for in-ear binaural recording. But I sometimes find this annoying and impractical when I want to respond quickly and record something. Sometimes, I use a product called Windfree, which is like a set of earmuffs but without the fur. It allows sound to come through it nearly unimpeded. I can also, in the winter, just cover my ears and head with a cuffed beanie or watchcap. I use a Carhartt-brand version.
Wind noise is a pain. It is one of the worst things I think I have encountered in field recording.
Here are a few images showing how to protect the microphones from recording too much wind noise, and each involves covering the microphones with something – usually foam or fur.


These foam balls (see below), I find, do not do much.

These fur covers over the binaural maxi ears (see below image) work really quite well, but there is still a lot of buffeting noise and some attenuation, so they’re far from perfect.

Connecting The Microphones
Connecting the microphones to the recorders is straightforward (mostly).
The DR-05 series accept only mini-plug input, while the DR-40X does not. So, for the DR-40X, you need an adapter to XLR if you want to plug in and power the microphones with mini plugs. These adapter cables can be purchased from Amazon or elsewhere at a fairly low cost (<$20).

Recorders
The recorders that I use are a Tascam DR-05, DR-05X, DR-05XP, and a Tascam DR-40X. These recorders can be taken almost anywhere in my shirt, pants, or coat pockets. I like them better than the Zoom recorders. Also, I used to use the Tascam DR-08, but it had problems with clicking and popping of its own case, which made the recordings problematic for cleaning up later.
When comparing the Tascam DR-05, DR-05X, DR-05XP, and DR-40X recorders to their Zoom counterparts, several advantages stand out that influenced my choice to go with the Tascam brand, but it is up to the user to decide. Zoom is a great brand, so I would weigh both options against your own personal preferences as the Zoom brand may be better for you.
Using the Tascam DR-05, DR-05X, DR-05XP,and DR-40X Recorders
The DR-05 series recorders are small, handheld recorders that can fit in my front pants pocket or in my coat inside pocket. I like these the best as I can carry them wherever I go. My previous DR-08 was smaller yet and could fit in my shirt pocket easily, but it had problems with the construction and the bad outweighed the good so I switched up to the DR-05 series.
The DR-40X is larger and has XLR inputs, so I use this less often and more for when I purposely set out for a field recording session, whereas the DR-05XP is for incidental and purposeful times.
Manuals for the DR-05 Series Recorders
Manuals for the DR-40X Recorder
Recording
The Tascam recorders record onto micro-SD cards and have inputs for USB transfer of files. I record in WAV format at 44.1kHz.
When recording outdoors with a tripod for a long period, I use a Tascam BP6-AA battery pack in order to get a longer record time and not have to change batteries very often. You can see it attached to the back of my recorder and connected through the USB. I use this only when on the tripod outdoors with the mini-ears because indoors or for portable use with the in-ear microphones, it is too large to carry easily. Although this model has been discontinued, there are several battery packs available out there now that can do the same thing. I own a Suptig brand one that works as well or better.
I’ve recently switched to rechargeable batteries for all of my recorders. They all take AA batteries so the Panasonic Eneloop Pro AA batteries and charger have been my choice.
Tripods
Outdoors with the binaural ears, I use a tripod for holding the recorder and microphones steady during the recording process. This can be any tripod that is steady and does not make noise. I have found that the smaller, lighter tripods do not work well because they make noise. Mine is a Benro brand, but any sturdy one will work.
While the mini ears (pictured below) are connected directly to the recorder, the larger maxi ears are not.

For the maxi ears (shown below) I use a separate tripod for the binaural maxi ears and another for the recorder.

I find that the Benro tripod TSL08AN00 works great for my needs for both the recorder (on one) and the binaural ears (on the other). I tried the Mefoto tripod which is heavier and would probably not transmit as much vibration, but I found just the opposite or equal results, so I stick with the Benro.
Tripod Height
I like the binaural ears to be about 2 1/2 feet above the ground. This seems about right to me from trials I have done. I tried the Mefoto and the Benro tripods at 2 feet above the ground and the sound is not quite “airy” enough for me. Likewise, above that and at human ear height, I lose a lot of the sounds of the ground-based sounds and tend to pick up a lot more of the distant traffic noise which I don’t need a lot more of and a lot more of the wind or air noise which is also not something I am after.
Recording Levels
The DR-05, DR-05X, DR-05XP, and DR-40X allow level settings, and I use them whenever I can. This is accessed when the recorder is on standby from the quick menu.

These are in the I/O menu of the DR-40X and are similarly called Reduction, Auto, and Limiter.
For the “set it and forget it” kind of sounds where I don’t know for sure what I’m going to get, I adjust the recording level input to 90 (max) and then use the Peak Reduction function during the standby recording. By doing this, the level is automatically set to the highest that does not distort. This setting is retained after recording. If I record a thunderstorm, for example, the peak level from the first thunder will set the max level to the point it will not distort and maintain that level throughout the recording. If a louder noise occurs later, the level will again be set lower to accommodate that peak level. I shoot for a -12dB level on the meter in the recorder.
After the level is set, the only thing to watch out for is that you do not inadvertently bump the microphone or otherwise cause a high signal. If you do, then the peak reduction function of the recorder will make all the sound recorded after that event a low level, resulting in disappointing results.

The DR-05 series also allows for peak limiting with the Limiter setting instead of the Peak Reduction. The idea is to adjust the recording level to where the average sounds hover around the -12dB mark on the display; then, if an excessive level comes in, it will be limited by the Limiter. If properly set up, this can be an effective tool for getting the levels you want.
The DR-40X has a similar meter display and I usually set it to Manual mode while recording, but occasionally use the Limiter mode just like on the DR-05 series.
If I have the in-ear microphones in my ears and listen to what I am to record while on standby record mode, the microphones take in the sound and show me the level on the meter so I can manually adjust the level. I adjust for an average level of -12 dB, as indicated on the recorder’s display while in standby recording mode. In doing this, I can usually use the limiter function instead of the peak reduction and effectively get exactly the levels and detail I need in my recordings.
Looking at the screen of the recorder, I watch the analog bars for Left and Right move and judge by the -12dB mark on the meter (circled in red below) that tells me where -12dB is. I try to keep the peaks in the sound during standby at or below this level and adjust the recorder’s recording level if needed to do so.


The third automatic level setting is the Auto Level setting. Using this instead of Limiter or Peak Reduction moves the recording levels up and down based on the incoming sounds. This can be good for some instances but will produce abnormally high lows and unusually low highs (compression), so this can ruin the realism of natural sound recordings, so I do not use it often. When I am recording industrial sounds of varying amplitude where realism is not expected, I use this setting. It is best suited for recording conversations and meetings.

As for the file format, bits per sample, and sampling rate, I use uncompressed, 24-bit wave file types recorded at 44.1 kHz.
File type I set as Wave (WAV).
- It is an uncompressed format, so I am not losing any information in compression.
- It is supported by many software clients, including Microsoft and Apple.
- Files can be manipulated from Wave into other formats as needed.
Bit per Sample I set at 24 bits or 32 bit float (if available).
- I used to use 16 bits as this covers 93-96dB of range and seemed to be enough for field recordings that usually have some noise in the background and maybe do not need the 24-bit.
- But I was wrong. I have found with my recordings that I lack the “air” sound in my 16-bit recordings, whereas my 24-bit ones have an “airy feel” that I really like.
- 24-bit is definitely better.
- This is probably because the noise floor is much lower in 24-bit recordings.
- The dynamic range is increased.
- There are 65,536 possible levels in 16-bit recordings, whereas 24-bit ones have a whopping 16,777,216 levels. This additional detail in 24-bit recordings is noticeable to me.
- Several professionals support 24-bit recording.
32-bit float is better yet! Use this if you have it available.
- In 32-bit float mode (DR-05XP only), you do not have to set a level for the input but you should set it a bit so that afterward you don’t have to do so much adjusting.
- You can set the level, but take care that it is not too high because if the signal is clipped you’ll lose it.
- I try for a level that fluctuates just under -20 on the meter. See image below where the green mark is. I put red Xs on the levels shown because those would be too high for me. But this is entirely up to you. I’m just showing you what I do with 32-bit float recording.
- The level adjust on the recorder during standby is usually around 35 for me, but it all depends on the material being recorded.


The sampling rate I set is 44.1 kHz.
- My output medium is CD-quality, and CDs only support the 44.1 kHz rate.
- To record at higher sampling rates means more data, but ultimately useless data because I have to downsample to 44.1 kHz to get to CD quality.
- Downsampling from 96 kHz or 48 kHz sampling rates to 44.1 kHz can cause errors that are audible in the final output. So, I do not want to downsample.
- Several professionals support 44.1 kHz recording/sampling.
To make recordings outdoors with binaural ears, I put my DR-05 series recorder and microphones in a sheltered area (from wind, rain, and snow), press the record button, and step away until my watch says it is time to come back and shut it off.
To make recordings indoors or outdoors with in-ear microphones on either the DR-05 series, or DR-40X, I put the microphones in my ears and the recorder in my pocket, then place myself where I want to record. I record anywhere from a few minutes to a half hour of sound in-location. I like to capture what it feels like to be there, so I may turn my head occasionally to get a different perspective. I might record this as a separate file or just keep recording one file. In general, I like to have one head (my head) position for a given file.
Here is an example of an in-ear binaural recording taken from inside a parked car facing a busy roadway with the windows down.
Invariably, there are unwanted noises on the resulting file that have to be removed, and I do that afterward in software.

Cellphone
I also use my cellphone for recording. I have an Android product right now, and there is a program called “Field Recorder” by Pfitzinger that does nice stereo recordings using the two microphones built into my cellphone. It is not binaural, but it still can capture a lot of nice sounds and it is usually always with me which is a serious advantage.
Post-Processing of Field Recordings
Additional resources are available at these helpful links:
FACT Magazine’s “A Beginner’s Guide To… Field Recording” by Lawrence English
Organizing and Cataloging Field Recordings
After getting the field recordings back home, here is how I organize my field recordings.
- Top folder – “Recorded Sounds”
- Subfolders – “Year,” 2018, 2019, 2020, 2021, etc.
- Files – filenames of “date_sequence_description” (see below)
- Subfolders – “Year,” 2018, 2019, 2020, 2021, etc.
I think the file name and description are what I really rely upon in my field recordings because I can scroll through the files and see what they are about.
First, I have the recorder (phone, DR-05X, etc.) set up to automatically assign a date to each wave file it records right in the file’s title. These are usually the year, followed by the date. For example, 180401 means April 1st, 2018.
The recorder then automatically adds a sequence number after it so I can have more than one file recorded on the same date, for example, 180407_0078 and 180407_0079, which are both on the same date but different recordings.
Then, back at the computer, after downloading the files and putting them in the correct year folder, I listen to each briefly and rename the files to have what the subjects are and, if possible and relevant, the location. See below in green highlight some files that have the location written in their titles.
If I modify a file and do not want to overwrite the original, I will make a copy, which automatically, by Windows, gets assigned a “- Copy” suffix to it. See below, highlighted in yellow.

By looking at the filename, I can determine if it was recorded on one of my Tascam recorders or on my phone recorder. The Tascam recorders I have set up to put the date first and then a sequence. But the phone recorder puts the date and then the time, so it looks different.
In the image below, you can see the highlighted one is from my phone, while all the others are from my Tascam recorders.

12 responses to “Master Field Recording: Techniques for Capturing and Organizing Sounds”
… reposted this!
… reposted this!
… reposted this!
… reposted this!
… reposted this!
… reposted this!
… reposted this!
… reposted this!
… reposted this!
… reposted this!
… reposted this!
… liked this!